...
IntelliBoard strongly recommends that the individual installing the IntelliBoard plugin and creating the Moodle Connection connection be the Site Administrator of the LMS System. The The LMS System user connecting IntelliBoard to Moodle must Moodle must have the ability permissions to enable web services, change modify web protocols, and create Moodle tokens.
IntelliBoard is a web-based service. If access to your LMS site is behind a firewall, a port will you would be need to be configured configure IP address and ports for IntelliBoard services to connect successfully. Contact us for necessary IP addresses.for a successful connection.
| Expand | ||
|---|---|---|
| ||
The IP address to enable is determined by the server where your IntelliBoard account is created. If you are not sure about your server, contact helpdesk@IntelliBoard.net for this information.
The ports remain the same for all servers and must be open.
|
To Create a Moodle Connection:
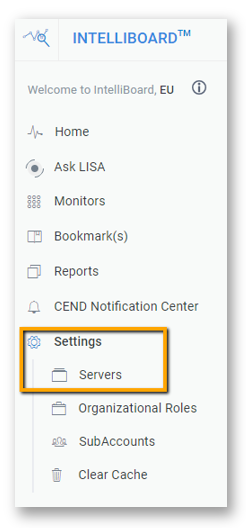
After logging on to IntelliBoard with the main subscription email, click Settings
From Settings, click Servers
From Servers, click + Add New and choose Moodle Connection

New

To Add Moodle Site to IntelliBoard:
Add your LMS Name (For identification purposes only)
Add your URL (Must be accessible from the internet; please be careful with https:// or http://, site dependent)
Add your Token (Copy and paste from your Moodle; you can find it here: Dashboard > Site Administration > Plugins > Web Services > Manage Tokensfind how to create token here: https://intelliboard.atlassian.net/wiki/x/AoCpjg)
Choose Protocol (Must match what is enabled in Moodle)Choose Size Mode; find how to enable it here: https://intelliboard.atlassian.net/wiki/x/AoCpjg)
Choose Server Category (Optional; may be created from Settings > Servers > Server Category)
Choose Hosting providers
Open Advanced Settings tab and switch on Active Connection
When connection is successful, click Save Connection
Note: If everything is good, you'll see 2 green check marks near your URL and Token and your Connection Status (in the top right corner) will get green smiley.Open Advanced Settings tab and switch on Active Connection
When connection is successful, click Save Connection


To Finish InstallationConnection Set Up:
The blue dot denotes that your Moodle site is connected to IntelliBoard. Explore your data through your dashboard at IntelliBoard.net

Still Getting Connection issues? Contact helpdesk@IntelliBoard.net
From Servers, click on the Moodle connection link (or the gear icon on the right-hand side) to access the connection editing page
Scroll to Teacher Roles and select the Moodle roles typically associated with instructors in your LMS (this will be applied to reports from User Reports > By Instructor Role category)
Scroll to Learner Roles and select the Moodle roles typically associated with learners in your LMS (this will be applied to reports from User Reports > By Learner Role category)
When roles are set, click Save

From Moodle, explore your data through Admin Dashboard under Site Administration > IntelliBoard > Dashboard
Frequently Asked Questions:
| Expand | ||
|---|---|---|
| ||
STEP ONEWe know this sounds silly, are you signing on with the email/password assigned with your IntelliBoard subscription? (There are so many passwords these days!) Remember there is one main email associated with your IntelliBoard subscription. (You may have other users who can access IntelliBoard through Sub Accounts/IB users, but there is only one email associated with the IntelliBoard subscription.) Also please make sure you are signing on to IntelliBoard 5.x+ Lite instead of IntelliBoard 4.8Pro. STEP TWO
Check the "Status" for your Moodle Instance(s). Click the "Moodle Connection" link.
 STEP THREEThe IntelliBoard 5.0 Lite plugin included includes a security update requiring the main subscription information to be included in the settings within your LMS system.
Add the email of the person who is
Still Getting Connection issues? Contact helpdesk@IntelliBoard.net. |